
The Best Video Conversion, Compression & Editing Software, Promo Codes & Deals
This article has been just updated:
In this article, we will talk about some of the various technical details of video files and codecs and take a look at a number of tools that can be used to convert, compress, and edit video files.
If you have ever watched a video or movie on your computer you have been exposed to the world of video codecs. Perhaps it was an unpleasant meeting when you received a ‘missing codec’ message that made it impossible to view your content. So what was that message all about? Let’s find out.
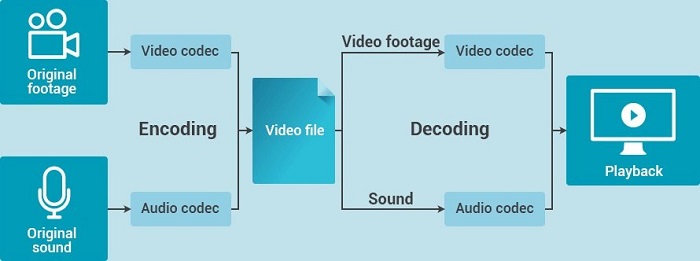
A codec is an algorithm that is used to encode data like a video clip. It must be decoded when played back, and the word codec is a contraction of the words ”coder/decoder”. Most codecs also compress the data resulting in smaller files which can be downloaded quickly and take up less disk space. You would then need the same codec to uncompress the file in order to watch it.
Video codecs can be lossy or lossless based on their impact on the quality of the original video file. This distinction also affects how much compression can be accomplished by using a particular type of codec.
Lossless codecs can achieve compression of about 50% while retaining the quality of the original media file.
Lossy codecs trade some video quality but can compress files down to around 10% of their initial size. Streaming video usually makes use of lossy codecs to minimize file transfer size.
There are many different codecs available to be used in processing video files. Some are designed to be employed in very specific usage scenarios and most computer users will never see them in action. Others are more general purpose and frequently process the videos that the average user watches on their machines.
The wide variety of codecs would make an exhaustive list impossible, but we will take a look at three different ones to give you a flavor of what is available.
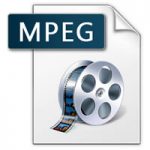 MPEG is an acronym for the Moving Pictures Expert Group. They are an organization that develops standards which are applied to the encoding of digital video and audio files. MPEG compression is instrumental in allowing multimedia files to be significantly reduced in size. This enables them to be transferred over the Internet more efficiently.
Without file compression, it would take an inordinate amount of time to download video and audio files. The name MPEG has become more closely associated with files saved in the MPEG format instead of the organization responsible for the standards. Since it was founded in 1998, the group has come up with several digital media standards including:
So as you can see, MPEG is not a single monolithic standard, but instead is an organization that is responsible for developing a number of standards. MPEG-4 is simply one part of the overall MPEG standards.
Differences exist between the standards as we shall illustrate by looking at the original MPEG-1 standard versus the MPEG-4 variation. MPEG-1 was used to compress files for use on CDs whereas the improved compression capabilities of MPEG-4 allow it to be used on DVDs and Blu-ray discs. The major difference in the two standards is the degree of compression applied to the multimedia files. MPEG-4 compression is critical in the age of mobile devices where storage space is always at a premium.
There will be times when you want to convert a MPEG-4 video to .mp4 format in order to use the clip on a mobile device such as an iPhone. Your only recourse in this situation is to use video conversion software to process your files and transform them into .mp4 files. There are many converters available, and we will take a look at a few of them later in this article.
HP is a remarkable company making laptops that are of renowned quality. Typically, anytime you are out to buy a laptop, you will find the HP brand outshine the others. HP improved the designs of their laptop compared to their earliest designs. You probably need HP coupon codes. Follow this link to get more from the HP laptops company. https://www.coupon-karma.com/hp/
Do you believe that Nordstrom started an ultimate clothing line with accessories, cosmetics, handbags and jewelry? The company was originally a renowned shoes store back in the year 1901. Currently, the company is a departmental chain with food and restaurant chains, house furnishing departments as well as wedding houses. The company offers a discount of 40% on the top rated brands. You probably need Nordstrom coupons to get more from what it’s offered.
Logitech is the innovative designer and the manufacture of technology as well as technology accessories. It is the first company to offer life changing devices. The company is famous because of its attention to minor details, high quality craftsmanship and the excellent innovations. Find Logitech best coupons here: https://www.coupon-karma.com/logitech
NordVPN is the popular Private Network Service provider established in the year 2012 by a group of four friends. NordVPN has the applications for the MacOS, Linux and Windows as weel as the mobile applications for the Android and IOS. NordVPN is the most preferred VPN globally. Find NordVPN coupon codes that are updated daily here.
GoPro is the company at the forefront of camera market. The company is developing accessories and cameras that push camera technology to their boundary. GoPro keeps the customers’ needs as their number one priority. GoPro is actually designed to help you record and share the most extreme experiences.
Enjoy GoPro deals here.
Choose any coupon brand by simply visiting Coupon Karma at https://www.coupon-karma.com
Video interlacing is a technique that was originally employed to allow the transmission of video content through the limited available bandwidth. It breaks up an image into even and odd scan lines., and displays them sequentially on the display device.
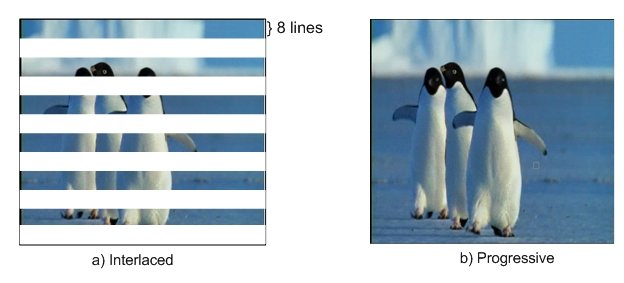
This is in contrast to a progressive video which displays all scan lines at the same time. You can tell if a video source is progressive or interlaced by the letter following the video definition that denotes the number of scan lines per image. So a source listed as 480p is progressive and one at 1080i is interlaced.
Interlacing can help prevent flicker and reduces the bandwidth required to transmit the video content. Modern displays need files that are in a progressive mode, and capturing still images from an interlaced video can produce less than ideal results.
When you run into issues with interlaced video you will need to convert it to progressive mode. This can be accomplished with many video converters such as the ones we will be discussing shortly.
Video files can take up a considerable amount of space on your storage device. When a video is compressed, it is encoded in a manner that consumes less storage space than the original file. This enables the file to be more easily transferred over a network or the Internet.
Compression is accomplished through the use of a codec and usually involves the removal of repetitive images and sounds from a video. The compressed video is in a new format that needs to be supported by the video player. Uncompressing the file to restore its original format is another option once a file has been transferred.
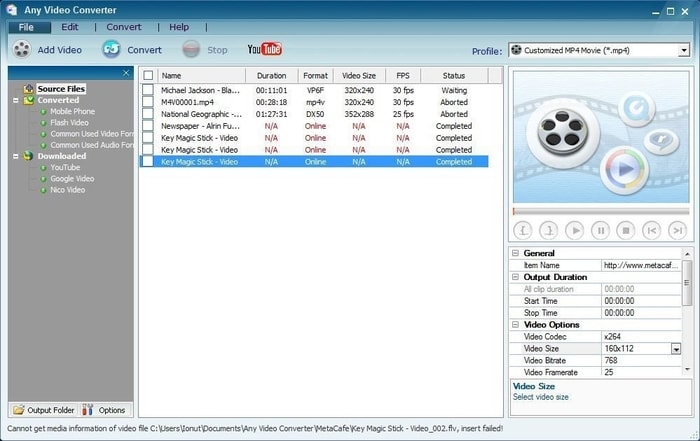
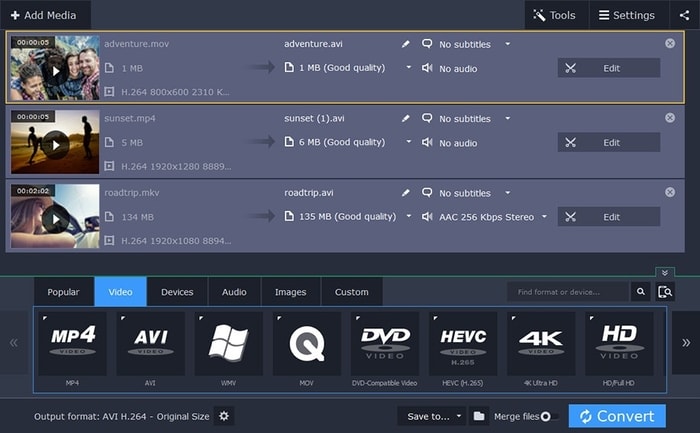
If you collect video files you will definitely appreciate the need to save storage space. Compressing your files can resolve that issue. Here are three of the top tools for compressing video files.
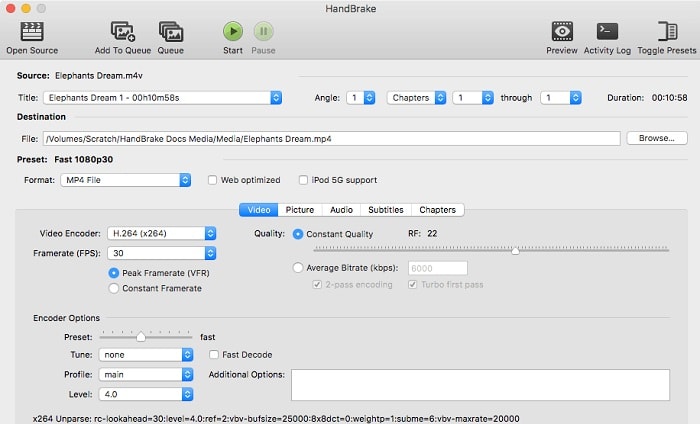
Handbrake is an open-source video converter that is an excellent tool for compressing video files. You can obtain a live preview of the compression with this freeware which has versions available for the Mac, Windows, and Linux platforms.
Free and paid versions of this video conversion software are available for both Windows and macOS computers. It’s packed with features including the ability to compress video files from any format.
This commercial software product offers lightning fast file conversion for those in need of speed. You can run it on Mac or Windows machines and it includes a host of advanced features including the ability to save your files for use on any mobile device.
If you’re a fan of online videos then you are sure to have some favorites. Maybe you have bookmarked them or just find them by searching when you need to view them. Another way to have your favorite videos easily accessible is to convert them to files that you can save and view at your leisure. Here are three great free online video converters that can turn online videos to downloadable files on your computer.
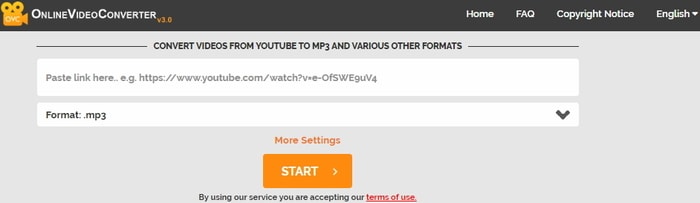
You have to appreciate a software package whose name describes its functionality. OnlineVideoConverter is aptly named and offers a free video conversion tool that can be used to convert videos into a number of formats including .mp4, .avi, .mpg, and .mov. No registration is required to use this utility and there is no limit to the number of files you can convert.
Simply paste a video link from YouTube, Facebook, Instagram or any of the other supported video sites and select the format you wish to use for the conversion. Speed may be affected during busy times when the free service’s servers are taxed, but in general, you will enjoy timely file conversions with this online tool.

Here is another free online tool that can be used with no registration. You place a link to your video from a source like YouTube and click on the “Start” button. The program retrieves the video and then presents you with options where you can select the video and audio format you will use. Advanced options let you cut or resize the video and you can even choose the codec that will be used for the conversion.
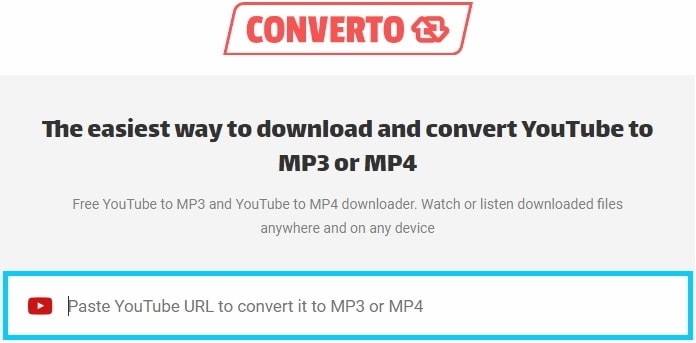
This online utility is designed specifically to convert YouTube videos to .mp3 or .mp4 formats. Just paste the YouTube link and the tool offers you options to choose a format or change the file name or ID3 tag. Click on “Convert” and let the program do its job. When finished you can download the converted file to the location of your choice.
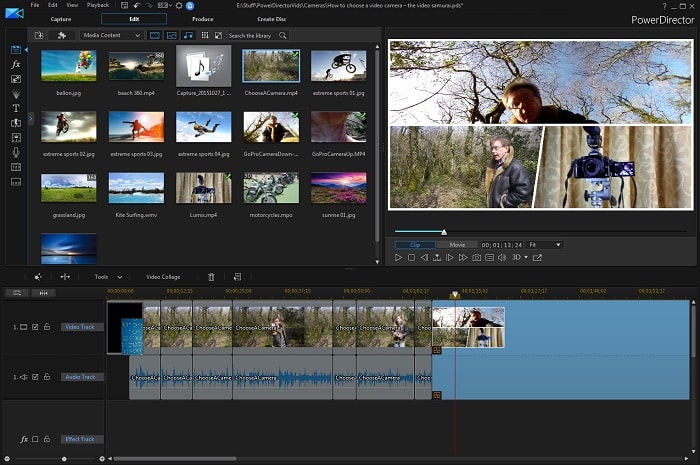
Here are three great video editors that will let you turn your video clips into masterpieces on your Mac or iOS device.
Apple’s iMovie application is an excellent video editor that is easy to use and can be obtained for free for the macOS or iOS. It has a wealth of features that enable you to quickly add high-quality titles and special effects to your videos. Filters can be employed to give your video a distinctive look, and the filters can be applied to individual clips or the complete movie at one time.
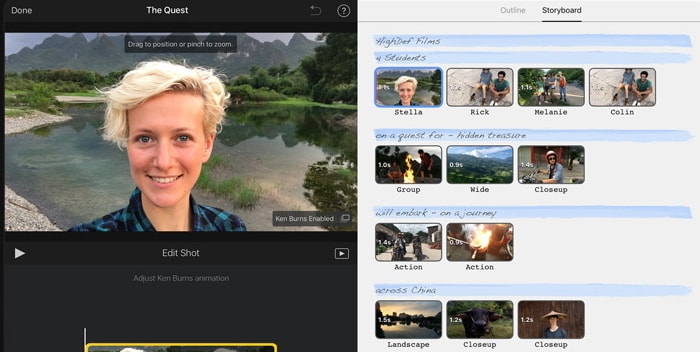
With iMovie you can post your completed work to social media sites or publish directly to YouTube. Having iMovie installed on both your iOS device and Mac machine lets you cut back and forth, editing the same video from both devices. If you are new to video editing, you can’t go wrong with iMovie.
This software application is available with a free 7-day trial after which you can choose to register or upgrade to the Pro version. It features an intuitive user interface that makes it possible to access all of its advanced features with a reasonable learning curve.
Once you get used to the workflow design of adding clips to your project, you will be creating stunning videos by availing yourself of the professional-grade tools included in the package. This is an extremely powerful video editor that will serve novices and professionals alike.
Here is a free version of the professional DaVinci Resolve 15 Studio application that includes many features which will allow you to create great videos. To obtain all of the free features, you should download it from the link provided above rather than from the Apple App Store.
This product is designed for serious video editing and includes a digital audio workstation so you can get the sound just right without leaving the editor. Visual effects such as vector painting, rotoscoping, and 3D compositing are at your fingertips. The tool is designed to make multi-user collaboration possible and allows for simultaneous editing of videos by multiple parties.
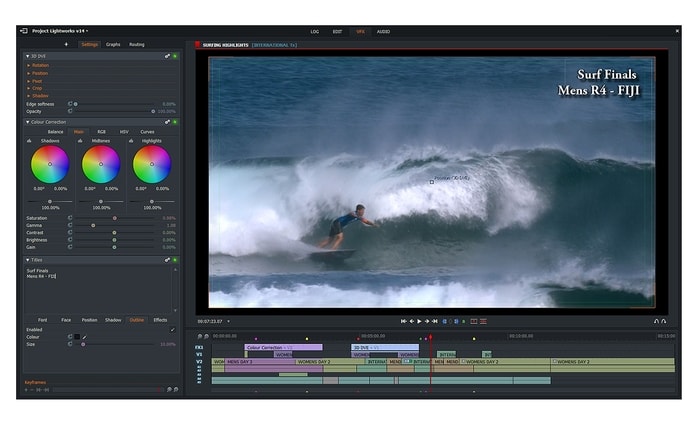
Adobe Premiere Pro is a subscription-based editor that provides Windows users with a powerful tool for collaborative video creation. You can try it for free with a 30-day trial, and Adobe makes regular updates that extend the functionality of the tool. It features a flexible interface which allows you to organize your project in the way that suits your working style.
You can treat your videos with effects such as color adjustment and transitions, add titles and captions, and perform precise audio editing. Collaboration is fostered by Adobe’s Creative Cloud Libraries and the ability to collaborate in real time. This cloud-centric approach allows a user to use any machine running the software to work on their project.
You can also use this application via a subscription or purchase the software outright. It is a powerful video editing tool that offers CyberLink Cloud storage as a way to safely store your settings and creations. This allows you to work on your projects from anywhere and the application provides 25GB of free storage with more available for purchase.
Features like one-click color correction, intelligent color matching, 360° editing, and frame-by-frame motion tracking give your videos a professional look. Many plug-ins and additions are available through premium creative design packs which enhance your ability to apply effects to your finished product.
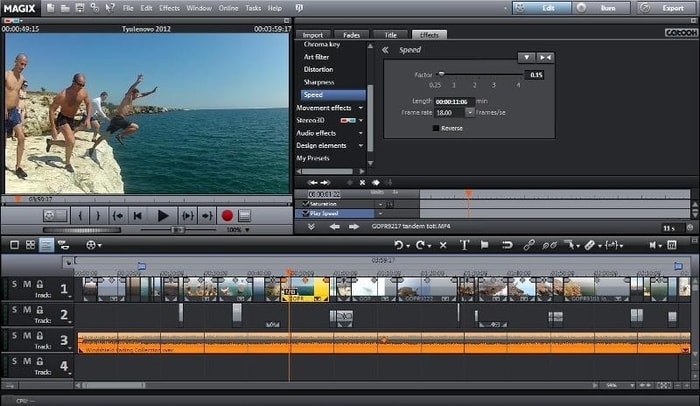
This offering by MAGIX is a stand-alone video editor that you can test drive with a 30-day free trial before committing to purchasing the product. Features such as dynamic title animation, image stabilization, and 360° editing let you create professional looking videos.
The application includes over 1,500 effects that can be added to your video files. If the program is purchased through a Microsoft account, you can use the software on up to ten Windows 10 machines. A storyboard mode is available for fast editing and you can directly upload your completed projects to YouTube, Facebook, and other platforms.
Choosing the best deleted video recovery software solution can be the difference between successfully getting all lost video files back and losing them forever. To help you make the right choice, we compared the most popular solutions currently available and narrowed them down to our top three.
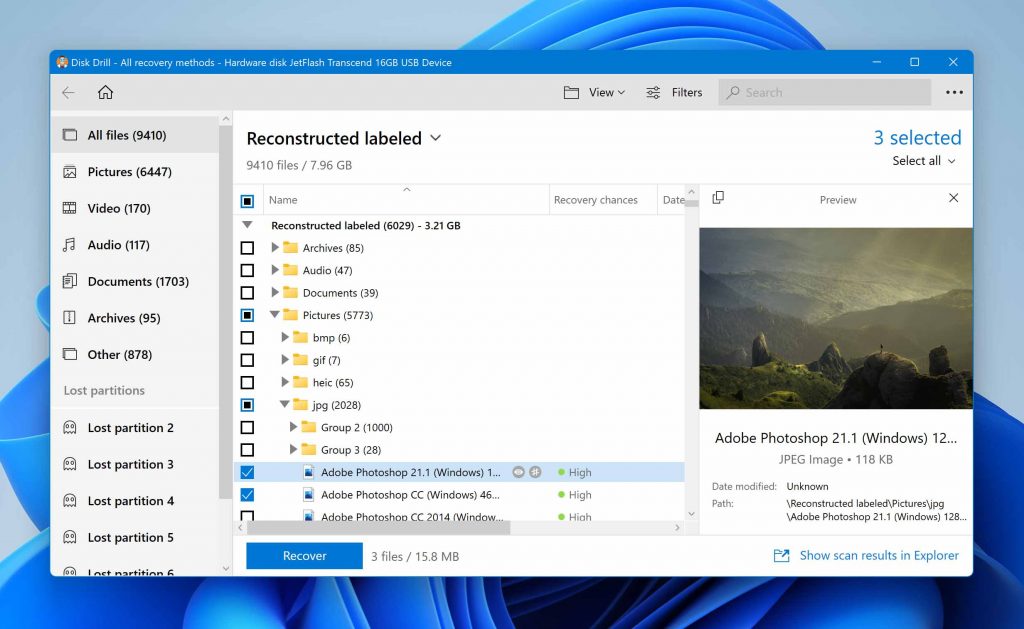
If you need to recover deleted videos from a hard drive, memory card, USB flash drive, or just about any other storage device, you can’t choose a better deleted video recovery software solution than Disk Drill.
You can install the video recovery software on any modern computer running Windows or macOS and learn how to recover deleted videos with it in seconds—that’s how easy to use it is.
Because Disk Drill is actively developed and frequently updated by a seasoned team of data recovery professionals, it consistently achieves the best data recovery outcomes of all available solutions.
Key features:
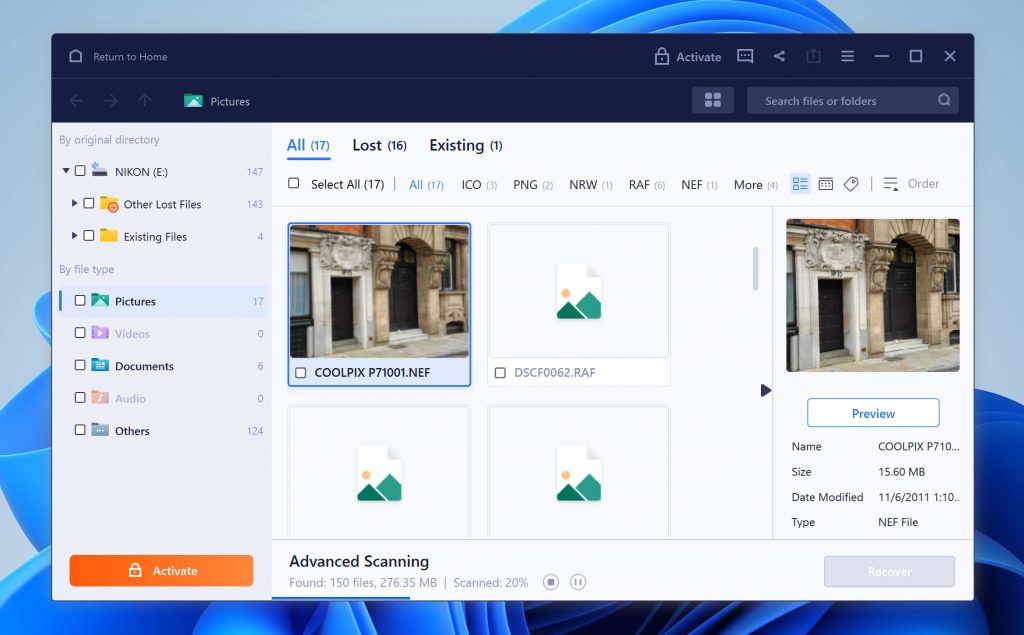
EaseUS Data Recovery Wizard is another popular video recovery software that can be used to retrieve deleted videos from an SD card, HDD, SSD, or just about any other storage device except for Android and iOS smartphones.
Besides its modern user interface and respectable performance, the software also attracts new users with the ability to recover up to 2 GB of data for free. While that probably won’t be enough for you to recover deleted videos recorded in high-definition, it’s more than enough to recover a few short videos downloaded from the internet or a whole bunch of Word, PDF, and other documents.
Unfortunately, EaseUS Data Recovery Wizard is quite expensive and heavily promotes subscription plans that end up costing its users a lot of money over time.
Key features:
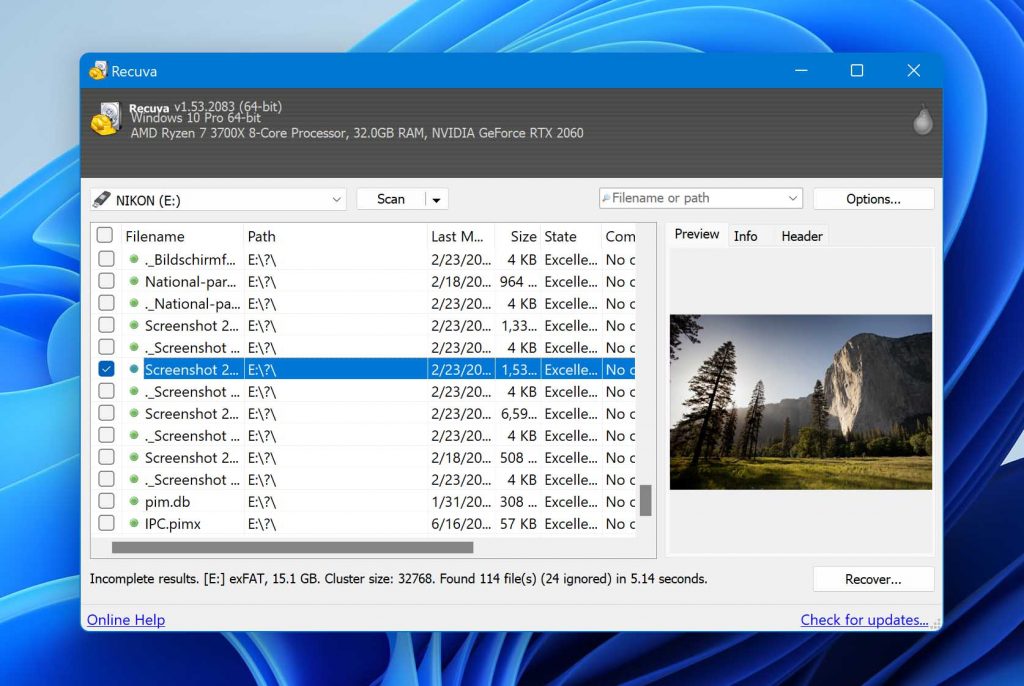
Even though Recuva has been outpaced by other video recovery software in recent years, it still remains one of the best video recovery software solutions for Windows users who don’t want to spend any money to get back lost data.
The application is geared toward beginners and provides a guided step-by-step recovery process that makes it virtually impossible to make a mistake. The fact that Recuva has been translated into many languages definitely helps too.
The biggest problem with Recuva is the lack of updates. It has been a very long time since a major update was released, which is why the application’s data recovery performance has been steadily getting worse and worse over the years.
Key features:
There you have it: our top 3 best deleted video recovery software solutions. Now that you know which applications are the best, it’s up to you to select the one you like the most and recover your lost video files with it. We wish you the best of luck.
There you have it. We hope that you have a better understanding of the intricacies of digital videos and how you can manipulate them to change formats, save space on your storage devices, and create professional-looking movies from clips taken on your mobile phone. Employing these tools will let you pour your creativity into creating videos with your imagination as the only limitation.